One of the best parts of this holiday was having the time to dig into a fun project: building a dollhouse! It was part gift for our 2.5 year old niece, part practice with the woodworking tools, and part opportunity to take a project from sketchy idea to finished product.
Sketchy Idea
The idea of a dollhouse was fuelled the many awesome DIY dollhouses out there on the interweb like this one and this one. But knowing that space is at a premium and toddler interests are fleeting, my number one priority was that it would be easily collapsible for storage. And so, sketch mode began: |
| The sketchy idea phase does actually involve sketches |
- Build a solid box (maybe with hinges so it folds flat) and a slot together insert that slides in?
- Idea 1 with a roof addition?
- Why bother with hinges when the whole structure could slot together?
- Or perhaps a more modern approach with one interior wall instead of side walls?
- Or something that opens from the side rather than the front?
More research revealed that a slot-together dollhouse is not a new idea. Case in point: this beautiful one from Norwegian company momoll that provided much inspiration.
 |
| Modern momoll slot together dollhouse |
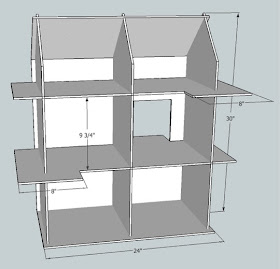
I also liked the look of ones that opened up on the side parallel to the roof as they looked more proportionally appropriate and let in more light with a half roof. The brainstorming got a bit more slick with the help of SketchUp and I ended up with a subdivision full of houses before landing on this:
 |
| SketchUp model of dollhouse plan |
Material
I hunted around hardware stores in the area before deciding on baltic birch plywood as the material of choice. The criteria was a strong, light, and nice looking plywood. I even considered bamboo but, knowing nothing about how to work with it, decided not to take that dive with this first project. Baltic birch plywood has more plies than regular plywood, which looks great if the edges are left unpainted.
We found it at our local Home Hardware in 5x5 sheets and metric thicknesses, which is how almost all baltic birch plywood sheets are sold. The beauty of building the whole thing as a slot-together unit meant I could choose a thinner panel instead of having to think about material for nails and screws to bite into. I chose 6 mm thickness (just shy of 1/4") as a good compromise between strength and weight and was able to create a cut list that used only one sheet.
Making
Once the cut list was figured out, it was just a matter of toiling away in the basement and wearing a coat of sawdust for a week. Many lessons were learned. One problem I had was lots of splintering on the edges when cutting with the circular saw. We tried to make some wood filler using the sawdust and wood glue, hoping the colour would blend in but it dried much darker than the sawdust colour itself. Tips like this and this would have been useful... for next time, I suppose :)
The most time consuming aspect of it (other than being overly cautious and measuring 17 times before doing anything) was setting up jigs to make sure pieces were supported and cuts were straight.
 |
| Random wooden boxes and scraps come in handy to support the panels |
I made the slots using a 1/4" straight router bit and cut the windows and doors with a combination of jig saw, router, Dremel (using mostly the sanding drums), and hole saw. The major corners were also cut down using the jigsaw and all the edges were rounded out with the sander. More sanding was done on all sides to smooth things out using 80 then 120 grit sandpaper while Garrett created this classy painting station:
 |
| Dollhouse panel finishing setup |
Yes, the old wood panelling comes to the rescue once again. I finished it with just a top coat thinking that a neutral finish might be more flexible than dictating a pink bedroom or blue bathroom, for example. It could always be painted or covered in "wallpaper" or stickers after the fact. So one coat of Polycrylic went on and, once dried, all was sanded with some 220 grit paper. The second coat was added while we wrapped up a Die Hard marathon inspired by an episode of The Office featuring the cinematic classic. The next morning, I finished things off with a beautiful hardware store discovery: waterproof sandpaper. Once soaked, the 400 grit sheets curled over the edges and corners so easily without cracking and left the panels amazingly smooth.
Assembling
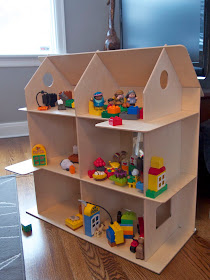
I thought I had accounted for the topcoat on the panels when cutting the slots but we had a rough time getting some of the panels slotted in. Nothing a little sanding could solve - a small piece of wood panelling (once again!) wrapped in 80 grit sandpaper fit quite nicely into the slots and give us good control over where to widen the slots. And finally, here is the finished product... complete with Duplo built couches, chairs, tables, and beds!
 |
| Assembled slot-together dollhouse |
The assembly is a straightforward process as follows: the sides stand up in bottom panel, the front slides down the sides and slots into the bottom panel, then the two floors and roof slide into the side panels. It's not the sturdiest thing in the world but definitely strong enough for pint-sized play time. And it all breaks down into a stack of panels less than 2" thick! We added a piece of felt to the underside of the bottom panel to prevent any scratches on the floor and make it easy to move while assembled. I had considered extending the green felt out the back to be a "yard" but figured it would probably just be a recipe for lots of slipping.
 |
 |
| View from back left | View from front |

No comments:
Post a Comment