
Since the insurance guy and remediation crew were here on Monday, they came again on Thursday to take a look at how the giant dehumidifier was doing and talk about next steps. The good news: they turned off the dehumidifier so we've had an evening of blissful quiet. The bad news: there are many, crazy next steps coming up. Warning: this is a very long post about those next steps...
As I said in the last post, the insurance will cover "emergency" and "restoration" work.
Emergency Service (aka addressing the immediate water damage)
We've confirmed that the entire kitchen will, in fact, be gutted. All four walls are coming down, as well as the ceiling and the floor. Since one of those walls - the exterior - holds our sink, our kitchen will be rendered non-functional. There was some confusion on the contractor's part about this wall needing to come out but we know there was water in it on account of what we saw spilling out of the window. To make things worse, we've been told in the past that UFFI (urea-formaldehyde foam insulation, discussed in excruciating detail on Day 11) can start to break down if it suffers any water damage so its performance suffers even more than any shrinkage it's undergone with age. If the exterior wall hadn't needed to come down, we may have been able to stay in the house during the tear down. Except that the bathroom floor and vanity are also coming out, leaving not a single sink in the house. So... we're moving into a hotel on Monday. The tear out starts Tuesday.And here's another fun tidbit: we will be completely locked out of the house for a week starting on Tuesday. Why?
 |
| Coles notes version: asbestos > 0% |
Restoration (aka getting things back to the way they were) Renovation (aka making lemonade)
Like I said yesterday, there is no point in restoring the house back to the state it was in before the incident just to tear it all out to remodel in a year or two. I don't know if this is possible with all insurance companies (and I got the sense from our agent that they are more flexible than other companies). We have the option of taking the money it would have cost to restore the space and using it to remodel. Anything beyond that "restoration" budget will come out of our pocket. It's not exactly the hands-on DIY approach we had planned but we've been handed a whole bushel of lemons so we're going to make some very sweet lemonade.Several evenings this week were spent brainstorming some plans for the kitchen. I thought I'd take you on a tour of what ideas got bounced around and why we like the one we've landed on, gussied up in a nearly-to-scale and dimensioned diagram.
For those who would like a refresher, this is what the kitchen looked like on closing day:
 |
 |
| View from dining room-kitchen shared wall | View from beside dining room doorway |
 |
 |
| View from sink of corner between dining room and mud room | View from sink of corner between alcove and dining room |


In previous discussions, the only element we had discussed was removing the wall between the kitchen and dining room and adding in a peninsula. Appliance locations hadn't been considered at all so this was a first attempt to fit things in. The range where the fridge is now was an idea for easy venting but to have enough space for the range plus a peninsula, as much as 2' of the dining room would be stolen for the peninsula. I also really didn't like the idea of the fridge next to a doorway - especially a more narrow than usual 30" doorway, barely leaving room for the fridge to open fully. We could have played around with appliance locations but kept going with overall layout ideas.
 This plan is probably closest to the original idea we had been talking about, although probably without the range on the peninsula. The open back of cooking area to the dining room is not something we were so keen about. If the range and fridge were switched, the peninsula would shrink lengthwise and the range would be trickier to vent on a non-exterior wall. Also, it's not marked on this diagram but there is a large amount of floor space between the peninsula and sink wall counter being completely underutilized.
 This plan corrects the cooking/eating area overlap by adding in a second tier for an eating bar. With the range on the lower tier and the need for the second tier to be wide enough for a place setting (~18"), this plan resulted in a huge and deep expanse of counter that didn't seem as practical as it could be. And the floor space problem was still left unsolved.
 Enter, the island. This idea makes much better use of the floor space and results in more useful counter space that is accessible from all sides. But with the fridge next to the alcove entrance, there wasn't much room to spare between the island and the fridge. We also lost a lot of the casual eating space that I liked about the peninsula. We could extend the island farther into the dining room to create a mini eating space for 2 people facing each other. We figured we could get rid of the narrow walkways by rotating the fridge against the exterior wall and giving a bit of space for a full height cabinet. This would result in dead space in the corner but we can easily make that accessible from the other side, which is next to the side door. We're thinking cubbies for shoes or similar items.
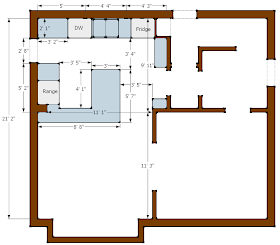
 Then I decided to bridge the gap between island and range counter with a "causeway" to reinstate the eating space. The path from range directly into the dining room is blocked but I actually like the idea of creating some separation between the two rooms. And the walk around past the sink really isn't that arduous.
With this plan in mind, we drew it up in SketchUp with dimensions and with all elements to scale. Garrett pulled out his Canadian Wood Council Span Book from university days and figured out that we could get probably away without a post on the island. The post next to the range would have to grow to accommodate the duct work, pipes, and electrical and support the beam. The "causeway" is 18" across but only infringes 13" into the dining room past the existing wall - just enough to tuck a stool under or space for your knees while you chow down on some breakfast.
 We'll be applying for the building permit early next week but any thoughts and opinions are welcome in the meantime. Now we just need to figure out what to do about the bathroom...


With this plan in mind, we drew it up in SketchUp with dimensions and with all elements to scale. Garrett pulled out his Canadian Wood Council Span Book from university days and figured out that we could get probably away without a post on the island. The post next to the range would have to grow to accommodate the duct work, pipes, and electrical and support the beam. The "causeway" is 18" across but only infringes 13" into the dining room past the existing wall - just enough to tuck a stool under or space for your knees while you chow down on some breakfast.

No comments:
Post a Comment