First off, thank you to everyone who took the time to give us feedback on our
counter-sink dilemma. I think we knew in our deep, dark hearts that the utility sink was what we wanted. You all gave us a good boost of confidence by agreeing - only one person preferred a vanity sink over the utility - so we tossed (well, I awkwardly heaved) the sink into our cart on a wallet shrinking trip to Lowe's.
As we watched the money flow out last week, we were rewarded with exponential growth on the progress charts. It was a fantastically busy week of Garrett's visiting family + running around getting materials for the basement work + deadlines for school work + dentist appointments. And thanks entirely to Garrett's dad, our basement bathroom/laundry room is well on its way to looking less like a basement and more like a
bathroom/laundry room. Here's a summary of the transformation.
Drain-Waste-Vent (DWV) rough-in + pouring cement
Two days before we left for Boston, the plumber finished with the DWV rough-in and I got the building inspector in to okay us for pouring cement. (Did I mention we spent a week in Boston? Did I mention the month of June is complete insanity?)
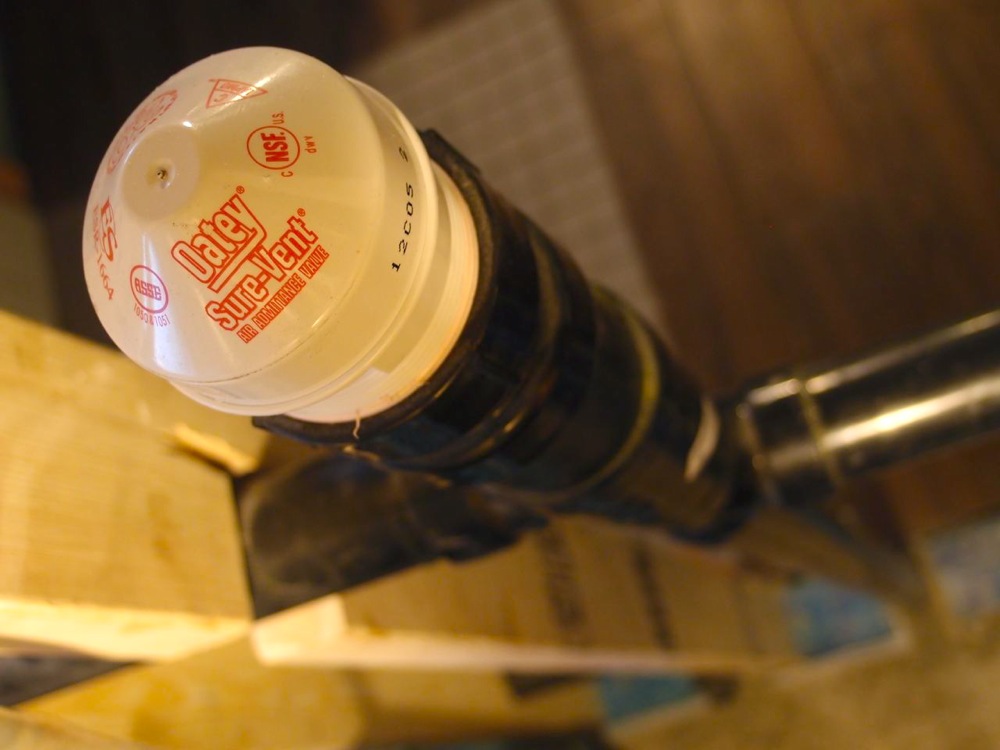
The first order of business when we got back was to fill in that giant hole left by the plumber. I wasn't around for this part so here's a photo of the finished product explaining what all of the crazy pipes do.
 |
| Basement DWV system. The sink and toilet share a vent and drain. The shower has no vent because it's within 5 feet of the AAV. The laundry and kitchen (for future use) share a drain. The 3" pipe with tangle of lines from the water softener, cistern overflow, heat recovery ventilator (HRV), and condensate pump (from the furnace) acts as a primer line for the new floor drain in the utility room (hidden behind its vent in this photo). |
 |
| Everything in the basement is vented through this CSA approved air admittance valve, affectionately known as a "cheater vent", as discussed here. |
Setting the shower pan
Actually, the real first order of business before pouring cement was to take out more of the existing concrete so that our shower pan could sit in the floor. Ladies and gentlemen, we've built a curbless shower. The original plan was to build a regular tiled shower stall with curbs and find a door to go with it. As we started looking around, it become quite apparent that a clearance of ~68" (once the curbs and ceiling were in place) was going to make it very difficult to find a nice looking door. Even a custom door at that height would probably look quite strange. It was suggested by a shower door guy that we skip the curbs and build the shower base flush with the rest of the floor.
You'll see in the photo above that the concrete for the shower stall sits ~1 1/2" lower than the rest of the floor. This gives us enough room to set in the shower pan, thinset, and tile so that it's all flush with the floor.
 |
| The Schluter Kerdi shower tray being set into place. This foam tray is pre-sloped so we can set our tiles right on and not have to worry about building a mortar bed with all the correct slopes for the water to drain properly. The tray comes as a 48" x 48" square which we cut down to 36" square. The fancy drain is designed to work with Kerdi waterproof membrane mats. Here's a detailed diagram on the Schluter website showing how the whole Kerdi system is supposed to work together. |
Building and waterproofing the shower + installing water supply lines
Once the tray was in place and more cement was added around it, things really started to take shape. The new interior wall was framed. Shower walls were built with some backer board we found a few months ago on Kijiji. Supply lines were cut and soldered. We had considered using PEX (plastic) for the supply lines but Garrett and his dad are both comfortable with copper, there was a bunch of copper that we could re-use, and the tools were handy so copper it was! The building inspector seemed to think it unusual that we used copper. I suppose the more flexible PEX is easier than dealing with gooey flux, hot torches, and drippy solder?
 |
| Left to right: supply lines for the shower, outdoor hose bib, kitchen sink, laundry. We also had to put in the bathroom fan duct before putting up the shower ceiling. |
Once the shower walls were up, it was time to waterproof the shower. We chose the Schluter Kerdi waterproofing membrane after research determined it's one of the best products on the market for the job. This may be a good time to explain our shower configuration. You'll note in the photo below that there is a corner cut off on the inside with a little triangular shelf. This shelf is not just for storage - it was a necessary addition to the shower to accommodate our cistern overflow pipe. (It's the metal pipe coming out of the ground two photos up. We've got enough to say about our cistern to fill up a whole other blog post so I'll leave it at that for now.) We would have liked to have two alcove shelves - one on either side of the valve - but the stud space to the left was taken up by extra supports for a door.
 |
| Waterproofed shower stall with alcove and shelf waiting for tile. |
In-floor radiant heat
We had decided long ago that in-floor heat would be a great addition to the space because 1) tile is cold; 2) basement floors are cold; 3) tile installed directly on the cement basement floor (to maximize vertical space) would be very, very cold. Shopping around, we landed on
Nuheat cable floor heating as the product for us. The cables are weaved through guides glued to the floor and then the thinset that the tiles sit on is applied directly over the cables. This means that our in-floor heating basically adds no vertical height to the floor - a priority for our low ceiling basement. Bought from a local tile store, it was way cheaper than getting the kits from Home Depot or Lowes and we like the 25 year warranty from what seems to be a very reputable company. An unexpected bonus of doing the curbless shower meant it would be relatively easy to also heat the shower base. Score! Using the cables made it easy to customize the heated areas, like making sure the space around the toilet bowl is fully covered and not heating under the cabinets.
 |
| Installed Nuheat floor heating cable waiting for thinset and tile. The black wire at the bottom is the sensor (which hooks up to the thermostat) before we glued it down and hid the excess wire in the wall. You can also see the spot next to the blue bucket that we've left unheated since this will be under the cabinet space for the sink. |
If you find yourself dealing with heating cable, you may want to do up a plan for how the cable will be laid to figure out what length you'll need. At first, we went by square footage and bought a kit with 64 square foot coverage (244 feet of cable). Once Garrett did up a plan, he figured 195 feet of cable would be enough so we exchanged for the 54 square foot coverage kit. Luckily, we hadn't started gluing down the guides or anything so the exchange was no problem.
 |
| Left to right: light switch, timer for bathroom fan (we're pretty jazzed about this), and floor heating thermostat. There are several thermostat options from Nuheat. We went with the Harmony, which is programmable (so we're not heating the floor unnecessarily) and fits into a standard decora faceplate. |
Tiling
Our tile was picked the day before we left for Boston so I was mildly concerned that we may have rushed a key decision. After lots of browsing at tile stores, we gravitated to wood-look tiles that we thought could add some warmth to the space.
This one seemed to fit the bill and was very reasonably priced compared to every other wood-y floor tile we saw. Since the 24" x 6" planks would be way too big to install in the shower base, we went with a simple grey mosaic tile thinking that we might try a few other grey accents around what will be a primarily white room. Being a basement with limited natural light, white will be the colour of choice on the walls and cabinets. We picked
this tile for the shower walls and ceiling because it's simple white with just a subtle bit of texture and interest.
 |
 |
| Floor tiles installed. |
Shower tile half-way done. |
 |
| Tile installed and ready for grout. |
And that's where we stand today. There is still lots left to do but it's a lovely feeling to see the room really take shape is such a short period of time. I'll be off next week for a month and a half out of town and school/work grows ever busy for Garrett so our progress curve will take a big dip over the next couple of months. Slowly, but surely, we will work our way to an actual shower in this house!


No comments:
Post a Comment